
Onhlp.com


BIOS (Basic Input and Output System) stores system hardware settings such as storage device configuration, overclocking settings, advanced power management, and boot device configuration that are needed for system startup in the motherboard CMOS. In normal circumstances, the default BIOS settings apply to most conditions to ensure optimal performance.
DO NOT change the default BIOS settings except in the following circumstances:
Inappropriate BIOS settings may result to instability or boot failure. We strongly recommend that you change the BIOS settings only with the help of a trained service personnel.
When downloading or updating the BIOS file, rename it as RX470IGM.CAP for this motherboard.
Knowing BIOS The new ASUS UEFI BIOS is a Unified Extensible Interface that complies with UEFI architecture, offering a user-friendly interface that goes beyond the traditional keyboard-only BIOS controls to enable a more flexible and convenient mouse input. You can easily navigate the new UEFI BIOS with the same smoothness as your operating system. The term “BIOS” in this user manual refers to “UEFI BIOS” unless otherwise specified.
Use the BIOS Setup to update the BIOS or configure its parameters. The BIOS screen include navigation keys and brief onscreen help to guide you in using the BIOS Setup program.
To enter BIOS Setup at startup, press <Delete> or <F2> during the Power-On Self Test (POST). If you do not press <Delete> or <F2>, POST continues with its routines.
Entering BIOS Setup after POST To enter BIOS Setup after POST:
After doing either of the three options, press <Delete> key to enter BIOS.
Please visit ASUS website for the detailed BIOS content manual.
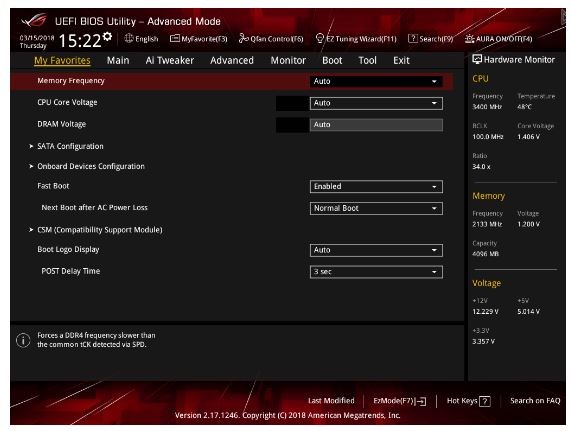
The BIOS Setup program can be used under two modes: EZ Mode and Advanced Mode. You can change modes from Setup Mode in Boot menu or by pressing the <F7> hotkey.
The Advanced Mode provides advanced options for experienced end-users to configure the BIOS settings. The figure below shows an example of the Advanced Mode. Refer to the following sections for the detailed configurations.
The default screen for entering the BIOS setup program can be changed. Refer to the Setup Mode item in section Boot menu for details.
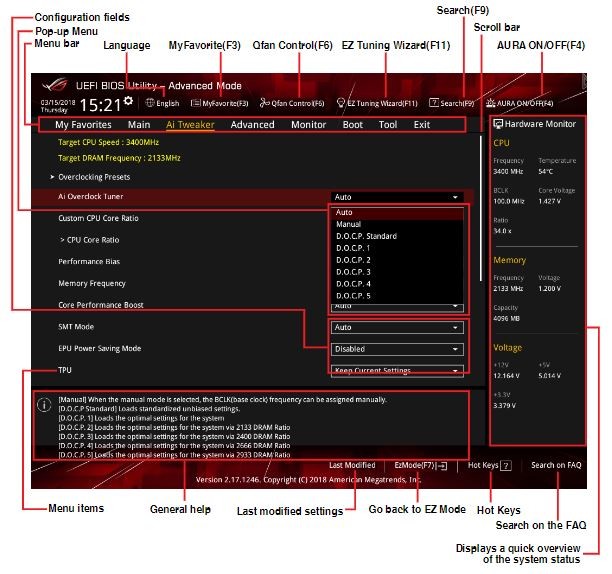
The menu bar on top of the screen has the following main items:
The highlighted item on the menu bar displays the specific items for that menu. For example, selecting Main shows the Main menu items. The other items (My Favorites, Ai Tweaker, Advanced, Monitor, Boot, Tool, and Exit) on the menu bar have their respective menu items.
A greater than sign (>) before each item on any menu screen means that the item has a submenu. To display the submenu, select the item and press <Enter>.
This button above the menu bar contains the languages that you can select for your BIOS. Click this button to select the language that you want to display in your BIOS screen.
This button above the menu bar shows all BIOS items in a Tree Map setup. Select frequently-used BIOS settings and save it to MyFavorites menu
Refer to section My Favorites for more information.
This button above the menu bar displays the current settings of your fans. Use this button to manually tweak the fans to your desired settings.
Refer to section QFan Control for more information.
This button above the menu bar allows you to view and tweak the overclocking settings of your system.
Refer to section EZ Tuning Wizard for more information.
This button allows you to search for BIOS items by entering its name, enter the item name to find the related item listing.
This button allows you to turn the RGB LED lighting or functional LED on or off.
A scroll bar appears on the right side of a menu screen when there are items that do not fit on the screen. Press the Up/Down arrow keys or <Page Up> / <Page Down> keys to display the other items on the screen.
At the bottom of the menu screen is a brief description of the selected item. Use <F12> key to capture the BIOS screen and save it to the removable storage device.
These fields show the values for the menu items. If an item is user-configurable, you can change the value of the field opposite the item. You cannot select an item that is notuser-configurable.
A configurable field is highlighted when selected. To change the value of a field, select it and press <Enter> to display a list of options.
This button contains the navigation keys for the BIOS setup program. Use the navigation keys to select items in the menu and change the settings.
This button shows the items that you last modified and saved in BIOS Setup.
The EZ Mode provides you an overview of the basic system information, and allows you to select the display language, system performance, mode and boot device priority. To access the Advanced Mode, select Advanced Mode or press the <F7> hotkeyfor the advanced BIOS settings.
To switch from Advanced Mode to EZ Mode, click EZ Mode(F7) or press the <F7> hotkey
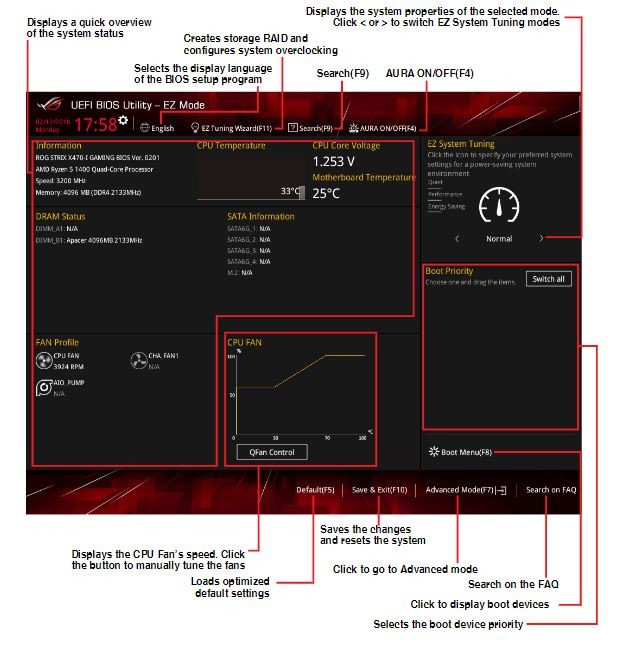
The boot device options vary depending on the devices you installed to the system
The QFan Control allows you to set a fan profile or manually configure the operating speed of your CPU and chassis fans.
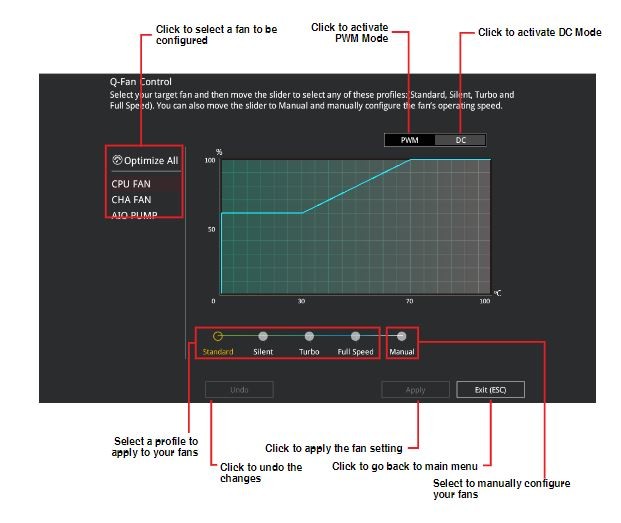
Select Manual from the list of profiles to manually configure your fans’ operating speed.

To configure your fans:
EZ Tuning Wizard allows you to easily overclock your CPU and DRAM, computer usage, and CPU fan to their best settings.
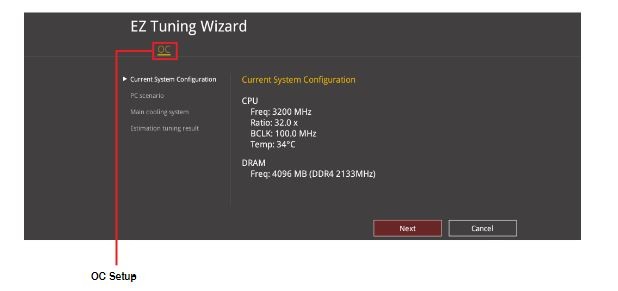
To start OC Tuning:
My Favorites is your personal space where you can easily save and access your favorite BIOS items.
My Favorites comes with several performance, power saving, and fast boot related items by default. You can personalize this screen by adding or removing items.
To add BIOS items:
The Main menu screen appears when you enter the Advanced Mode of the BIOS Setup program. The Main menu provides you an overview of the basic system information, and allows you to set the system date, time, language, and security settings.
The Security menu items allow you to change the system security settings.
The Ai Tweaker menu items allow you to configure overclocking-related items.
Be cautious when changing the settings of the Ai Tweaker menu items. Incorrect field values can cause the system to malfunction. The configuration options for this section vary depending on the CPU and DIMM model you installed on the motherboard.
Allows you to select the CPU overclocking options to achieve the desired CPU internal frequency. Configuration options:
The following item appears only when you set the Ai Overclocking Tuner to [Manual].
This item allows you to set the BCLK frequency to enhance the system performance. Use the <+> or <-> to adjust the value.
We recommend you to set the value based on the CPU specification, as high BCLK frequencies may damage the CPU permanently.
This item allows you to set a custom CPU core ratio. The CPU core ratio is calculated with the formula: 2 * FID / DID.
Configuration options: [Auto] [Manual]
The following items appear only when you set the Custom CPU Core Ratio to [Manual].
FID: This item allows you to set the core frequency multiplier. Use the <+> or <-> to adjust the value.
DID: This item allows you to set the core frequency divisor. Use the <+> or <-> to adjust the value.
This item allows you to set the memory operating frequency. The configurable options vary with the BCLK (base clock) frequency setting. Select the auto mode to apply the optimized setting.
Configuration options: [Auto] [DDR4-1333MHz] - [DDR4-4200MHz]
TPU: This item allows you to automatically overclock the CPU and DRAM frequencies and voltage for an enhanced system performance.
[Keep Current Settings]: Keep the current settings without changing anything.
[TPU I]: Applies air cooling overclocking conditions.
[TPU II]: Applies water cooling overclocking conditions.
Ensure to use water cooling device before selecting [TPU II].
The Advanced menu items allow you to change the settings for the CPU and other system devices.
Be cautious when changing the settings of the Advanced menu items. Incorrect field values can cause the system to malfunction.
The items in this menu show the AMD fTPM configuration options.
Firmware TPM: This item allows you to enable or disable AMD CPU fTPM.Configuration options: [Enable] [Disable]
When Firmware TPM is set to disabled all saved data on it will be lost.
The items in this menu show the CPU-related information that the BIOS automatically detects.
The items in this menu may vary based on the CPU installed.
PSS Support: This item allows you enable or disable the generation of ACPI_PPC, _PSS, and _PCT objects.
Configuration options: [Disabled] [Enabled] [Auto]
SVM Mode: This item allows you enable or disable CPU Virtualization.
Configuration options: [Disabled] [Enabled]
While entering Setup, the BIOS automatically detects the presence of SATA devices. The SATA Port items show Not Present if no SATA device is installed to the corresponding SATA port.
SATA Port Enable: This item allows you to enable or disable the SATA Device.
Configuration options: [Disabled] [Enabled]
SATA Mode: This item allows you to set the SATA configuration.
[AHCI]: Set to [AHCI] when you want the SATA hard disk drives to use the AHCI (Advanced Host Controller Interface). The AHCI allows the onboard storage driver to enable advanced Serial ATA features that increases storage performance on random workloads by allowing the drive to internally optimize the order of commands.
[RAID]: Set to [RAID] when you want to create a RAID configuration from the SATA hard disk drives.
This item allows you to enable or disable the NVMe RAID mode.
Configuration options: [Disabled] [Enabled]
S.M.A.R.T. (Self-Monitoring, Analysis and Reporting Technology) is a monitoring system that shows a warning message during POST (Power-on Self Test) when an error occurs in the hard disks.
Configuration options: [On] [Off]
The items in this menu allow you to switch between PCIe Lanes and configure onboard devices.
HD Audio Controller: This item allows you to use the Azalia High Definition Audio ControllerConfiguration options: [Disabled] [Enabled]
Audio Jack LED Lighting: This item allows you to turn the RGB LED lighting for the Audio Jack LED on or off.[Disabled]: The audio jack LEDs will not light up.[Auto]: The audio jack LEDs will light up
The audio jack LEDs will light up during S0(Working), S3(Sleep), S4(Hibernation), S5(Soft off) states. The LEDs will not light up when ErP Ready is Enabled at S5 state, or S4 and S5 state
[Auto]: Auto-detects the M.2_2 slot. If an M.2 device is detected, PCIEX16 will run at x8 mode, respectively.
[Disabled(X16 mode)]: Disable M.2_2 for PCIEX16 running on high performance. (x16)
This item allows you to set the link speed for PCIEX16/X8_1 slot. Configuration options: [Auto] [GEN 1] [GEN 2] [GEN 3]
This item allows you to set the link speed for M.2_1 Device. Configuration options: [Auto] [GEN 1] [GEN 2] [GEN 3]
This item allows you to set the link speed for M.2_2 Device. Configuration options: [Auto] [GEN 1] [GEN 2] [GEN 3]
This item allows you to set the link speed for Southbridge. Configuration options: [Auto] [GEN 1] [GEN 2] [GEN 3]
When system is in working state: This item allows you to turn the RGB LED lighting on or off when the system is in the working state. Configuration options: [On] [Off]
When system is in sleep, hibernate or soft off states: This item allows you to turn the RGB LED lighting on or off when the system is in the sleep, hibernate or soft off states.Configuration options: [On] [Off]
This item allows you to enable or disable the Intel LAN controllers. Configuration options: [Disabled] [Enabled]
This item allows you to enable or disable the Wi-Fi controller. Configuration options: [Disabled] [Enabled]
This item allows you to enable or disable the Bluetooth controller. Configuration options: [Disabled] [Enabled]
The items in this menu allow you to set system wake and sleep settings.
ErP Ready [Disabled]: This item allows you to switch off some power at S4+S5 or S5 to get the system ready for ErP requirement. When set to [Enabled], all other PME options are switched off.Configuration options: [Disabled] [Enable(S4+S5)] [Enable(S5)]
Restore On AC Power Loss: This item allows your system to go to ON state, OFF state, or both states after an AC power loss. When setting your system to [Last State], it goes to the previous state before the AC power loss. Configuration options: [Power Off] [Power On] [Last State]
Power On By PCI-E/PCI: This item allows you to enable or disable the Wake-on-LAN function of the onboard LAN controller or other installed PCI-E LAN cards. Configuration options: [Disabled] [Enabled]
Power On By RTC: This item allows you to enable or disable the RTC (Real-Time Clock) to generate a wake event and configure the RTC alarm date. When enabled, you can set the days, hours, minutes, or seconds to schedule an RTC alarm date. Configuration options: [Disabled] [Enabled]
The items in this menu allow you to enable or disable the UEFI network stack
This menu displays the SMART information of the connected devices. NVM Express devices do not support SMART information.
The items in this menu allow you to change the USB-related features.
The Mass Storage Devices item shows the auto-detected values. If no USB device is detected, the item shows None
[Enabled]: Your system supports the USB devices in legacy operating systems.
[Disabled]: Your USB devices can be used for BIOS setup only and cannot be recognized in the boot devices list.
[Auto]: Your system automatically detects the presence of USB devices at startup. If any USB devices are detected, the legacy USB support is enabled.
[Enabled]: Enables the support for operating systems without an XHCI hand-off feature.
[Disabled]: Disables the XHCI Hand-off support.
This item allows you to enable or disable USB Mass Storage Driver Support. Configuration options: [Disabled] [Enabled]
This item allows you to enable or disable the individual USB ports.
Published: Sunday, April 19, 2020 Viewed 93 times.
Ask me about:

technician / 4/19/2020 6:07:30 PM (Original: 612X574 px)

technician / 4/19/2020 6:08:37 PM (Original: 626X650 px)

technician / 4/19/2020 6:09:27 PM (Original: 621X523 px)

technician / 4/19/2020 6:10:07 PM (Original: 616X436 px)

technician / 4/19/2020 6:11:21 PM (Original: 618X291 px)

technician / 4/19/2020 6:11:52 PM (Original: 571X431 px)
ESP-enabled visualization in business can streamline data analysis, offering real-time insights for informed decision-making, improving efficiency and effectiveness.
ESP-enabled visualization Answers: 0 497
Learn about common error codes for the GA-990FX-Gaming motherboard and how to troubleshoot and resolve them effectively to ensure optimal performance.
GA-990FX-Gaming motherboard error code list Answers: 0 1599
Learn how to connect your Stylo 4 to your TV without relying on internet connectivity for streaming or mirroring content using simple methods and cables.
Stylo 4 to TV without internet Answers: 0 512
Discover simple and effective solutions to resolve Xiaomi SIM card activation issues on your device quickly and efficiently. Don't let technical difficulties stand in your way.
Xiaomi SIM card activation issue fix Answers: 0 333
Learn how to troubleshoot Xiaomi SIM card configuration problems like No SIM card detected error. Follow these steps to fix the issue and get your SIM card working properly.
Xiaomi SIM card configuration problem Answers: 0 315
Learn how to replace the motor sensor on your LG washer with our step-by-step guide. No specific tools required, just follow our simple instructions.
LG washer motor sensor replacement Answers: 0 524
Learn about common POST codes on the GA-990FX-Gaming motherboard to troubleshoot booting issues effectively. Understanding these codes can streamline the debugging process.
GA-990FX-Gaming motherboard POST codes Answers: 0 468
Learn how to reset or recover your forgotten Comcast network password. Understand the steps involved in regaining access to your account.
Comcast network password recovery Answers: 0 349
Learn how to change or reset your Comcast internet connection password easily with step-by-step instructions and helpful tips. Keep your network secure!
Comcast internet connection password Answers: 0 481
Learn how to unlock your LG Stylo without an OTG cable by using alternative methods such as Google Find My Device or performing a hard reset.
LG Stylo bypass without OTG cable Answers: 0 486
Learn how to bypass Google verification on your LG Stylo to unlock your device and regain access. Follow simple steps to remove the verification process.
LG Stylo Google verification removal Answers: 0 183
Learn how to troubleshoot and fix the OE error code on your LG washer. Discover the possible causes and solutions to resolve this issue effectively.
LG washer troubleshooting codes Answers: 0 318
Learn how to troubleshoot Xiaomi SIM card activation issues on your device. Follow these steps to resolve any problems with your SIM card activation.
Troubleshoot Xiaomi SIM card activation Answers: 0 141
Learn how to activate a SIM card on your Xiaomi device with these recommended steps to ensure your device functions properly.
Xiaomi SIM card activation steps Answers: 0 147
Learn how to connect your LG Stylo 4 to your television using an HDMI cable or wireless connection, with simple steps and guidelines provided in this article.
Connect Stylo 4 to television Answers: 0 165
onhlp.com: Your Questions and Answers Resource with a Wealth of General Knowledge
Are you seeking a one-stop destination for comprehensive knowledge and answers to your burning questions? Look no further than onhlp.com! Our platform is your go-to source for a wide range of information, all conveniently presented in an easily accessible question and answer format.
At onhlp.com, we pride ourselves on being your reliable knowledge hub. Whether you're curious about technology, science, history, or any other subject under the sun, our extensive General Knowledge (GK) knowledge base has you covered. We've made it our mission to provide you with in-depth insights and facts on an array of topics. Read more
